Kicker Speaker Box enclosure design diy how to building
subwoofer box
projects loudspeaker plans
Kicker Speaker Box enclosure design diy how to building subwoofer box
projects loudspeaker plans
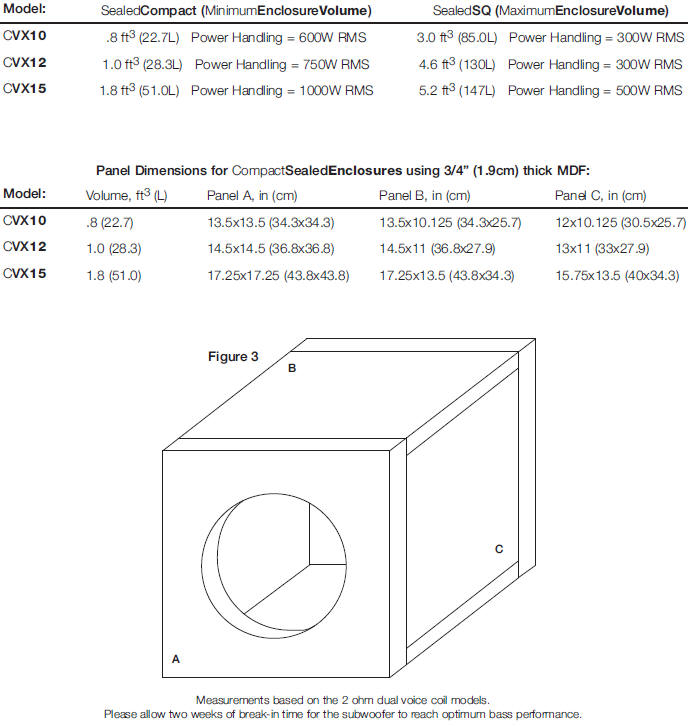
The CompVX generates more sound pressure than competing subwoofers on
the market and excels
when used in the recommended sealed boxes. These sealed enclosure
designs give the smoothest
response with increased energy at the lowest frequencies, 20 to 30Hz.
These designs deliver massive
amounts of highly-accurate bass and can be driven with punishing levels
of amplifier power.

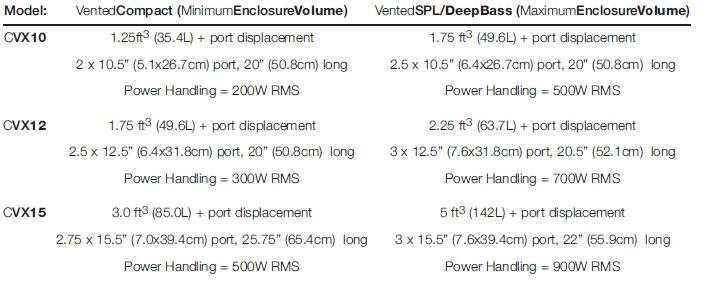
Kicker Vented Enclosure subwoofer box project with CVX10, CVX12,
CVX15 driver
The ported Compact design increases bass efficiency and fits in many
space-limited applications.
Although it is the smallest recommended ported enclosure, the output
from 30 to 80 Hz will be
considerably higher than that of any sealed box. The SPL / Deep Bass
ported design has even more
output in this crucial frequency band.
The SPL / Deep Bass is the largest and most efficient enclosure design.
The SPL / Deep Bass delivers
the sonic output needed to win SPL contests and it produces bass notes
“all the way down to the
cella”. This design turns heads and jump starts your heart.


Kicker subwoofer Box Building Notes
Use 3/4” (1.9cm) or thicker MDF (medium density fiberboard) and seal
the joints with silicone. Use the
“template” inside your CompVX’s shipping carton to mark the mounting
hole, then cut directly on the
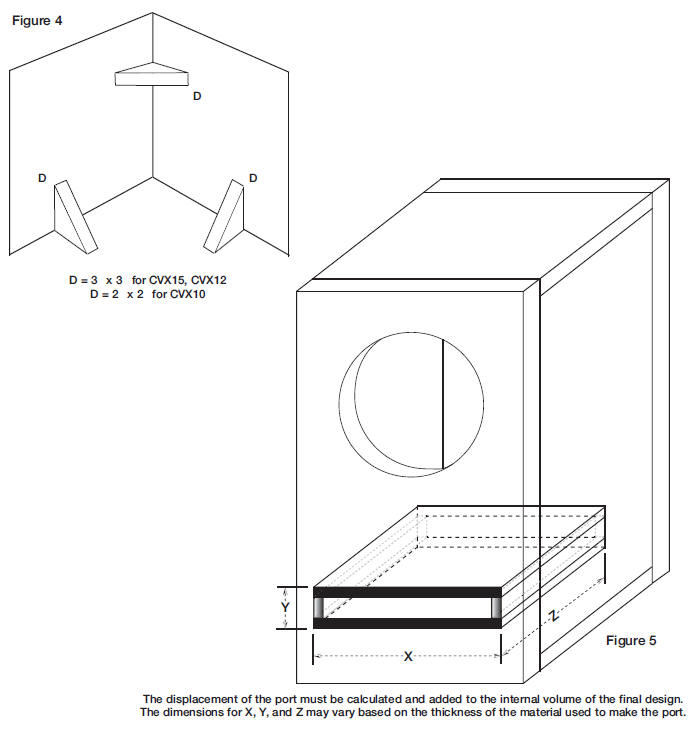
line. These designs need internal bracing. Add triangular bracing
between each of the larger
unsupported panels. See Figure 4.
All the cubic feet (L) measurements in this manual include the
displacement of the woofer. For the
vented enclosures the displacement of the port must be calculated and
added to the internal volume of
the final design. Use the outer dimensions of the port and multiply “X x
Y x Z”, convert to cubic feet, for
example the CVX12 vented compact design’s external port dimensions are,
using 3/4” (1.9cm) MDF:
[ (2.5” + 1.5” total MDF wall thickness) x (12.5” + 1.5” total MDF wall
thickness) x 20”] x (1 ft3 / 1728
in3) = .65 ft3, and add this number to the internal volume of the
enclosure, CVX12’s 1.75 ft3 + .65 ft3 =
2.40 ft3. See Figure 5. Due to the necessary length of these ports, you
may want to fold the port along
the bottom and back walls. It will be impractical to use round ports for
these designs.
Do not install a port opening against a solid surface, such as an
internal brace, back-panel or trunk wall,
seat or interior panel of your vehicle. The port opening must remain
unobstructed. Use the smallest
dimension of the rectangular port as the minimum amount of space between
the port opening and any
solid surface to insure unrestricted airflow.
If you prefer an ultra-smooth bass response, you should loosely fill
your CompVX enclosure with
poly-fil stuffing. Ported designs will require covering the end of the
port (located inside the box) with grill
cloth, chicken wire, or expanded metal to prevent the poly-fil from
exiting the port. The use of poly-fil
will slightly decrease efficiency, but will deepen and extend the low
frequency output.
WiringOptions
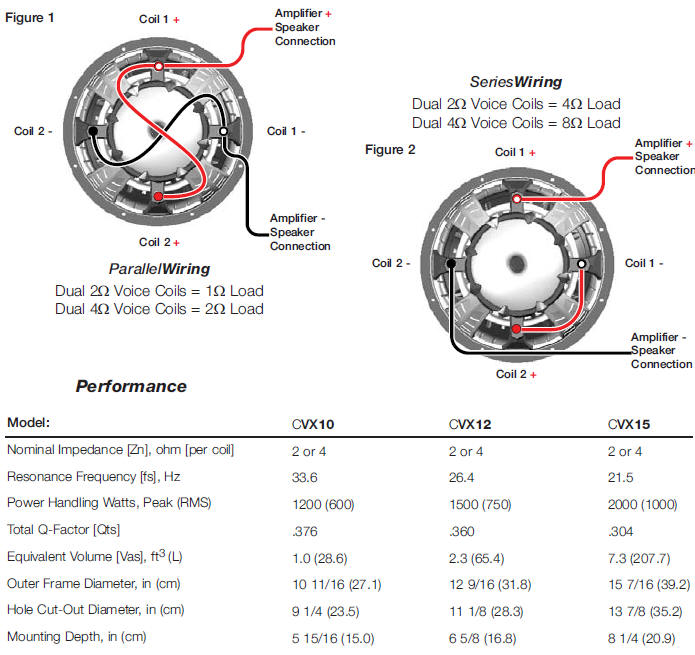
CompVX subwoofers are available with dual 2Ω (ohm) or dual 4Ω voice
coils. Both coils must be
connected to a source of amplification. The dual 2Ω woofer will generate
a 1Ω load if the coils are
wired in parallel or a 4Ω load in series. The dual 4Ω woofer will
provide a 2Ω load wired in parallel or
8Ω load wired in series. The terminals with the white dots are for the
first voice coil. The terminals with
solid-red and solid-black markings are for the second voice coil. See
Figures 1 and 2.

|